Create a Bash Script to Generate a Salesforce Session ID
Follow these step-by-step instructions to create a simple, easy-to-remember terminal command that will generate a Salesforce Session ID.

Um…Why Would You Need a Session ID?
Yeah, let's get that question out of the way now.
Sometimes you just need to make a quick API call from Postman or curl and you don't want to mess around with the token endpoints, credentials, connected apps, figuring out the right grant type and, all that jazz.
Depending on your setup in Salesforce and/or your SSO provider, it can actually be a non-trivial thing to generate the session ID needed for the Bearer token in an API call.
So once again, we will turn to our old pal SFDX.
Don't Have SFDX installed? Check the link below:
Salesforce Developers
Salesforce Developer Website
 Salesforce
Wait, Doesn't SFDX Already Do This?
Well… yes. We are just putting a wrapper around the SFDX call to make the output a little cleaner and the command easier to remember.
Ok, so let's get started
Hopefully, you already have a place where you store small personal projects and utilities that you create or download. For me, it's Always ~/Documents/Projects no matter if it's on my Mac, PC, or Linux machine (so I never forget where I put stuff). I would highly recommend organizing your work this way, but if you're the type that leaves your files scattered all about, well, to each, their own, I suppose 😀.
ℹ️
FYI: Just in case you don't know, in most command-line environments the
~ character is shorthand for your home directory which, on Mac, it would be something like /Users/username/. On Windows, it would typically be c:\Users\username.Ok, enough of this digression, let's get back to the point. Navigate to someplace you will still remember in a few years and create a new folder for your script. I called my sf-get-session-id
💡
When working with command-line tools, it's always preferred to avoid using spaces in file and folder names.
cd ~/Documents/Projects
mkdir sf-get-session-id
Inside that folder create a new file called sf-get-session-id.sh
cd sf-get-session-id
code sf-get-session-id.sh
The second command there just tells VS Code to create a file and open it up in the editor. If you want to use something else as your editor, modify that line to open the new file in your application of choice, or use touch sf-get-session-id.sh to just create the file. Then open it up manually.
ℹ️
Making a folder for a single file does 2 things for us.
1) It gives us a little future-proofing. If we later decide to add more files to this project, we don't need to create a folder that would change the path of our original file.
2) When we list the directories in our projects folder, it just looks tidier to see everything in a folder with no loose files hanging around.
Ok first we need to add a few variables to help us get some colorful output in the terminal
#!/bin/bash
RED='\033[0;31m'
CYAN='\033[0;36m'
NC='\033[0m' # No Color
That first line is referred to as a shebang. You can read all about it and why it's important over here.
The other lines are as follows:
RED: This gobbledygook tells the terminal to pick up its red pen and start printing all the output in red.CYAN: Same here, but cyan, obviously.NC: This tells the terminal to stop being so dang artistic and go back to its default color.
Now, what we want in the end, is for a user to pass our script one command line argument (the SFDX Alias), so let's make some conditional logic to test for that arg
if [[ $# -eq 0 ]]; then
  printf "${RED}Expected one argument (SFDX Alias) but not was given${NC}%s\n"
fi
This if block checks to make sure that there is at least one argument. Technically we could check to make sure there is only one, but it's not so important here because we will be taking only the first one and ignoring anything else. Plus it gives us the flexibility to later add new features based on additional arguments if we desire.
Notice how we are adding the RED escape sequence at the beginning of our error message and then immediately resetting the color at the end with the NC sequence.
Now, let's make it actually do something useful. Here is the complete file. Just add the else block inside of the if.
#!/bin/bash
RED='\033[0;31m'
CYAN='\033[0;36m'
NC='\033[0m' # No Color
if [[ $# -eq 0 ]]; then
  printf "${RED}Expected one argument (SFDX Alias) but not was given${NC}%s\n"
else
  resp=$(sfdx force:org:open -r -u $1)
  sid="$(cut -d '=' -f2 <<< $resp)"
  printf "%s\n${CYAN}$sid${NC}%s\n"
fi
Let's break down what's happening here.
The first line in the else block creates a sub-process, denoted by the $(...) bit, In that sub-process, we are just calling the sfdx force:org:open command and passing it two arguments. -u represents the "user" or "alias". Here the value is set to $1 which is a special variable that represents the first command line argument passed into our script. We are also using the -r flag which tells SFDX to only return a login URL and not actually open it in the browser. You can read more about this command in the SFDX Docs. The output of the sub-process gets stored in the resp variable
The next line creates a variable called sid (short for Session ID), and spins up a new sub-process that uses the cut command. Then we feed the resp variable into that sub-process using <<<. When you call the SFDX command in this way, it returns to you a URL with a query parameter of sid=. We just want what comes after the equal sign. That's what the cut command is doing for us. See the example below.
...salesforce.com/secur/frontdoor.jsp?sid=00D6A...Lastly, we use the printf command to print some formatted text to the terminal. Here we are just wrapping the variable sid in those same escape sequences to make the output a nice cyan color.
Alright, now just save it and we can try it out.
A Quick Note About Permissions
As it stands now your operating system will not allow this file to run because we did not give it "execute" privileges. Getting into what all of that means is way outside the of scope of this post, so for now, just run the following commands
Go to the folder we created earlier (your terminal may still be there).
cd sf-get-session-idThen run:
chmod +x sf-get-session-id.shThis will modify the permissions to allow the file to be executed.
Now, let's give it a go. Make sure your terminal is still in the same directory and run this command
./sf-get-session-id.sh <YOUR-SFDX-ALIAS>Just replace <YOUR-SFDX-ALIAS> with your actual alias. If you can't remember the exact name use used for an alias, you can type sfdx force:org:list to get a list of your authorized orgs with their alias names.
If everything went according to plan, you should get a session ID
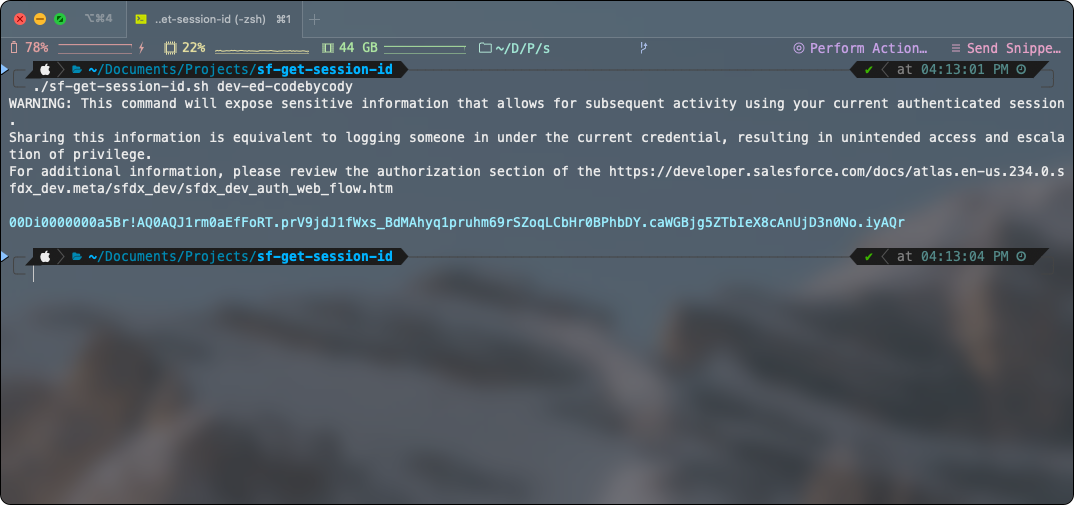
Along with the session ID, you will also see a warning. This is actually quite important. This session ID is basically like a username and password. If someone else were to get a hold of it, they would be able to log in as you, provided that the session is not expired. I'm only sharing it in the image above because it will have long since expired by the time anyone reads it. But seriously, be careful with this.
One Last Step
Ok, so we tested it and it works great, but there are still 2 problems.
- We didn't give it an easy-to-remember name
- We can only execute it if we are in this directory, or we type the full path to it—Not very convenient.
So let's fix that with an "alias" (a shell alias, not to be confused with an SFDX alias). If you are on a Linux machine or a Windows machine running "Git for Windows" or a Linux distro via Windows LFS, you are likely running a bash shell. If you are on a modern Mac, you are likely running a zsh shell. The steps for bash and zsh are virtually the same, the only difference will be the name of the file we need to edit.
For Windows and Linux machines you will need to edit a file in your home directory called .bashrc. For Macs, the file is called .zshrc. Notice the dot in the file name in both instances. These are colloquially called "dotfiles" and the dot is meant to tell your operating system that they are "hidden". Dotfiles are commonly used to hold configuration details.
So depending on your OS settings, you may or not be able to see this file in the UI, so we'll use our terminal to edit it. Also, depending on your system, this file may not even exist. No worries though, the following command will create it automatically if it doesn't exist.
code ~/.bashrcor
code ~/.zshrcFeel free to use nano or some other editor if you wish, but if you know what nano is, you probably don't need this part of the tutorial 🤓.
Once the file opens, you will need to add the following line:
alias sfsid=fully/qualified/path/to/Projects/sf-get-session-id/sf-get-session-id.sh❗
In the line above, be sure that the string on the right of the = sign is the full path to your file, starting at the root of your drive. For example, I'm on a Mac, and my fully qualified path is
Also note that there are no spaces on either side of the = sign.
/Users/codysechelski/Documents/Projects/sf-get-session-id/sf-get-session-id.shAlso note that there are no spaces on either side of the = sign.
Depending on your system, your .*rc file may be completely empty or really full of all sorts of stuff. It really doesn't matter too much where you add this line. If you see a bunch of other lines that all start with alias, it might make sense to add it to that section. If you are unsure, the safest bet is just to add it to the very end of the file.
Now let's talk about what this line does. the keyword alias tells our shell that we are creating something akin to a variable. so every time we type what is on the left side of the equal sign, the shell will interpret it as whatever is on the right side of the equal sign. Simple enough, right? Here I am naming the alias sfsid (short for Salesforce Session ID), if you want to call it something different, feel free to change it.
Also, the reason that we want the file path to be fully qualified is so we can call it from anywhere, not just the directory where we created the script.
Now you can save and close the file, but don't try to use the new alias in your terminal yet.
Your terminal will only read this .*rc file at start up. So any instances (windows/tabs) of your shell that were opened before we made this change will not be aware of it.
So just close your terminal, and open it up again. Now you should be able to type:
sfdid <MY-ALIAS>and get a session id regardless of what directory you are in! 🙌🏻 🎉
Final Thoughts
I really hope this was helpful and informative. I'd love to hear your thoughts on it in the comments below. Please also drop me a comment if you are having any issues getting it to work.
If you found this to be useful, please help me out by sharing this with your friends and colleagues, or on your social media channels.